创建自定义古腾堡块——第 7 部分:创建您自己的自定义组件

到目前为止,在本教程系列中,我们已经在registerBlockType()的edit函数中编写了所有代码。这是完全可能的,而且通常建议将编辑分配给单独的组件。通过这样做,我们可以利用组件状态和生命周期方法等功能。它还更清晰、可读并提供可重用的代码!
如果您不熟悉创建 React 组件或什么是状态和生命周期方法,我建议您先阅读React 的官方指南。
本文涉及的内容包括:
定义类组件edit
您可以将组件定义为函数或类。通过类组件,您可以使用状态和生命周期方法等功能。然而,在较新的 React 版本(16+)中,您可以使用 React hooks 来模拟功能组件内的状态和生命周期方法。但在本教程中,我们将专注于创建类组件。到目前为止,我们在本系列中创建的registerBlockType()foredit和中的“内联”save是函数组件。
为了定义类组件,我们扩展了 WordPress 的Component(在wp.element包中),就像您将类组件扩展到React.Component.
请记住,您的类组件必须包含函数render()。并且由于 Javascript 的工作方式,您的类必须在调用之前registerBlockType()定义(首先在文件中编写您的类组件,然后保留registerBlockType()它。在这篇文章的后面,我们将学习如何将组件分离到单独的文件中,导出和包含他们)。
简而言之,像这样:
const { registerBlockType } = wp.blocks;
const { Component } = wp.element;class FirstBlockEdit extends Component {
render() {
const { attributes, setAttributes } = this.props;
return …
}
}registerBlockType(‘awp/firstblock’, {
title: ‘My first block’,
edit: FirstBlockEdit,
save: (props) => {
return …
}
});
来自的道具edit会自动应用于我们的组件。不要忘记类组件需要使用this.props. 在 WordPress Gutenberg 核心中,为功能使用单独的组件是很常见的,edit因为它们通常包含更多的代码。该save函数通常可以保留,registerBlockType()除非它也包含很多代码。
通过这样做,您现在可以像使用 React 一样编写组件。您可以添加函数、构造函数、状态和生命周期方法。
这是我们在最后一步中完成的代码,转换为类组件:
const { registerBlockType } = wp.blocks;
const { Component } = wp.element;
const { RichText, InspectorControls, BlockControls, AlignmentToolbar } = wp.blockEditor;
const { ToggleControl, PanelBody, PanelRow, CheckboxControl, SelectControl, ColorPicker, Toolbar, IconButton } = wp.components;class FirstBlockEdit extends Component {
render() {
const { attributes, setAttributes } = this.props;const alignmentClass = (attributes.textAlignment != null) ? ‘has-text-align-‘ + attributes.textAlignment : ”;
return (
<div className={alignmentClass}>
<InspectorControls>
<PanelBody
title=”Most awesome settings ever”
initialOpen={true}
>
<PanelRow>
<ToggleControl
label=”Toggle me”
checked={attributes.toggle}
onChange={(newval) => setAttributes({ toggle: newval })}
/>
</PanelRow>
<PanelRow>
<SelectControl
label=”What’s your favorite animal?”
value={attributes.favoriteAnimal}
options={[
{label: “Dogs”, value: ‘dogs’},
{label: “Cats”, value: ‘cats’},
{label: “Something else”, value: ‘weird_one’},
]}
onChange={(newval) => setAttributes({ favoriteAnimal: newval })}
/>
</PanelRow>
<PanelRow>
<ColorPicker
color={attributes.favoriteColor}
onChangeComplete={(newval) => setAttributes({ favoriteColor: newval.hex })}
disableAlpha
/>
</PanelRow>
<PanelRow>
<CheckboxControl
label=”Activate lasers?”
checked={attributes.activateLasers}
onChange={(newval) => setAttributes({ activateLasers: newval })}
/>
</PanelRow>
</PanelBody>
</InspectorControls>
<BlockControls>
<AlignmentToolbar
value={attributes.textAlignment}
onChange={(newalign) => setAttributes({ textAlignment: newalign })}
/>
<Toolbar>
<IconButton
label=”My very own custom button”
icon=”edit”
className=”my-custom-button”
onClick={() => console.log(‘pressed button’)}
/>
</Toolbar>
</BlockControls>
<RichText
tagName=”h2″
placeholder=”Write your heading here”
value={attributes.myRichHeading}
onChange={(newtext) => setAttributes({ myRichHeading: newtext })}
/>
<RichText
tagName=”p”
placeholder=”Write your paragraph here”
value={attributes.myRichText}
onChange={(newtext) => setAttributes({ myRichText: newtext })}
/>
</div>
);
}
}registerBlockType(‘awp/firstblock’, {
title: ‘My first block’,
category: ‘common’,
icon: ‘smiley’,
description: ‘Learning in progress’,
keywords: [‘example’, ‘test’],
attributes: {
myRichHeading: {
type: ‘string’,
},
myRichText: {
type: ‘string’,
source: ‘html’,
selector: ‘p’
},
textAlignment: {
type: ‘string’,
},
toggle: {
type: ‘boolean’,
default: true
},
favoriteAnimal: {
type: ‘string’,
default: ‘dogs’
},
favoriteColor: {
type: ‘string’,
default: ‘#DDDDDD’
},
activateLasers: {
type: ‘boolean’,
default: false
},
},
supports: {
align: [‘wide’, ‘full’]
},
edit: FirstBlockEdit,
save: (props) => {
const { attributes } = props;const alignmentClass = (attributes.textAlignment != null) ? ‘has-text-align-‘ + attributes.textAlignment : ”;
return (
<div className={alignmentClass}>
<RichText.Content
tagName=”h2″
value={attributes.myRichHeading}
/>
<RichText.Content
tagName=”p”
value={attributes.myRichText}
/>
{attributes.activateLasers &&
<div className=”lasers”>Lasers activated</div>
}
</div>
);
}
});
如果你像我们一样从道具中解构attributes,setAttributes那么当你进入一个单独的类组件时,你需要做的只是改变一行;#9从props到this.props。所有代码都将像以前一样工作,无需修复任何其他内容。这就是解构的美妙之处。如果您不对其进行解构并props.attributes直接引用 eg,则需要在对和this.所有位置的所有单独引用之前添加。attributessetAttributes
让我们开始做我们现在可以用类组件做的事情吧!
定义函数和this
当然,是的,您可以在edit调用return. 但就个人而言,我一直更喜欢按逻辑分离功能。我发现最好在负责呈现输出的函数之外将用于逻辑和其他目的的函数分开。有些人还喜欢在事件中调用函数,而不是像我们目前所做的那样内联调用函数(例如,做setAttributes())onChange。
截至目前,我们的代码有两件事可能有利于移出功能;InspectorControls和BlockControls。这将大大缩短我们return的代码并使我们的代码更易于阅读。
我们定义了两个返回整个InspectorControls块和整个BlockControls块的函数。通过使用箭头函数 ( functionName = () => { ... }),我们可以完全访问thisprops。如果您没有执行步骤 1 的最后一部分——使用最新语法设置 Babel,您将遇到编译错误。您必须求助于this为每个函数创建构造函数和绑定。您可以在React 的常见问题解答页面this的开头阅读更多关于处理的信息。
还要记住,因为我们现在在一个类中,所以你需要this.在前面调用它的所有函数。
class FirstBlockEdit extends Component {
getInspectorControls = () => {
const { attributes, setAttributes } = this.props;return (
<InspectorControls>
…
</InspectorControls>
);
}getBlockControls = () => {
const { attributes, setAttributes } = this.props;return (
<BlockControls>
…
</BlockControls>
);
}render() {
const { attributes, setAttributes } = this.props;const alignmentClass = (attributes.textAlignment != null) ? ‘has-text-align-‘ + attributes.textAlignment : ”;
return ([
this.getInspectorControls(),
this.getBlockControls(),
<div className={alignmentClass}>
<RichText
tagName=”h2″
placeholder=”Write your heading here”
value={attributes.myRichHeading}
onChange={(newtext) => setAttributes({ myRichHeading: newtext })}
/>
<RichText
tagName=”p”
placeholder=”Write your paragraph here”
value={attributes.myRichText}
onChange={(newtext) => setAttributes({ myRichText: newtext })}
/>
</div>
]);
}
}
请注意,我已经排除了 的实际内容InspectorControls并使BlockControls代码更短。他们的代码中没有任何内容需要更改。
return我们还利用了语句也可以返回数组的事实。数组中的所有内容都将按照它们所在的顺序照常呈现。这使我们可以轻松地直接在return语句中调用函数。
您显然也可以定义生命周期方法,例如componentDidMount(). 在 Gutenberg 组件中执行这些操作与在 React 中没有区别。
构造函数和使用状态
让我们尝试在我们的组件中实现状态。请记住,状态只是临时存储在我们的类组件中的东西,不会保存在任何地方——比如属性中。它只是为了控制——好吧——你的组件的状态。状态的常见用途是在等待异步调用返回时将状态用作状态标志,在将某些内容保存在属性中之前保持临时评分,或实现块“预览/编辑模式”。
你就像在 React 中一样引用状态和更新状态;与this.state和setState()。通常你会在构造函数中初始化状态。至于定义构造函数——它与 React 中完全一样——不要忘记 passprops和 do super(props)。简而言之:
class FirstBlockEdit extends Component {
constructor(props) {
super(props);this.state = {
example: 1
}
}render() {
this.setState({ example: 2 });
console.log(this.state.example);
…
块模式编辑/预览切换器
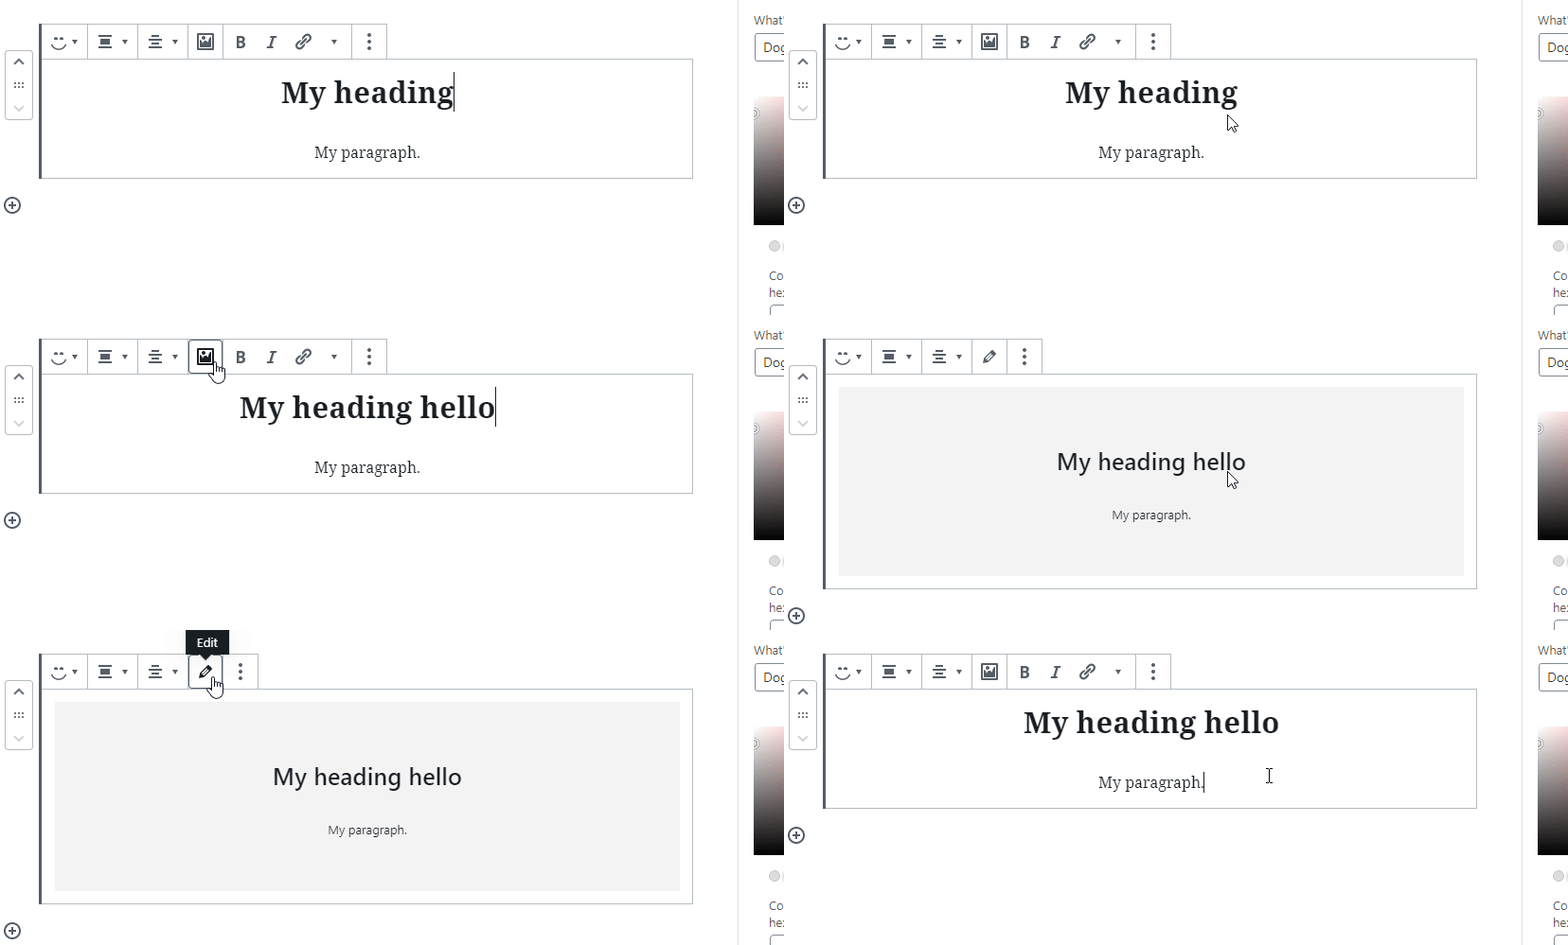
让我们使用我们在工具栏上一步中学到的知识为我们的块创建一个“模式切换器”。我们实现了一个带有按钮的工具栏,可以在预览和编辑模式之间切换状态。在编辑模式下,块像往常一样获取两个 RichText 组件。但是当切换到预览模式时,我们禁用了编辑和渲染块输出。
首先,我们创建一个构造函数并使用一个布尔属性设置状态;editMode以true. super(props)在基于类的 React 组件中定义构造函数时,这是必需的。
class FirstBlockEdit extends Component {
constructor(props) {
super(props);
this.state = {
editMode: true
}
}
…
在我们用于输出工具栏的函数中,我们更改了之前创建的自定义按钮(只有console.log在单击它时才会出现)。在它的支持下onClick,我们调用setState()并否定当前的editMode布尔值。为了让用户更容易理解,我们还在按钮的图标和标签之间切换。例如,当预览模式处于活动状态时,该按钮会显示“编辑”标签和一个通常被接受为编辑的铅笔图标。
getBlockControls = () => {
const { attributes, setAttributes } = this.props;
return (
<BlockControls>
<AlignmentToolbar
value={attributes.textAlignment}
onChange={(newalign) => setAttributes({ textAlignment: newalign })}
/>
<Toolbar>
<IconButton
label={ this.state.editMode ? “Preview” : “Edit” }
icon={ this.state.editMode ? “format-image” : “edit” }
onClick={() => this.setState({ editMode: !this.state.editMode })}
/>
</Toolbar>
</BlockControls>
);
}
最后在我们块的主要渲染方法中,我们可以做我们想做的事。这部分真的取决于你——你做的和我们对上面按钮上的标签和图标做的一样。我们添加了两个输出块,一个 if this.state.editModeis true(应该是通常的可编辑RichText组件),另一个 if it’s false。
作为示例,我使用了来自 ; 的两个 WordPress 组件wp.components;Placeholder和Disabled预览模式。该Placeholder组件将您的块放在一个漂亮的灰色框中,非常清楚它是不可编辑的。请记住,它附带样式,因此如果您想要完美的预览,这可能不适合您。而且我还将所有内容都包装在一个Disabled组件中,这使得所有内容都不可编辑、不可点击和不可拖动。这是我们render()组件中的新功能:
const { …, Fragment } = wp.element;
const {… Placeholder, Disabled } = wp.components; // Don’t forget to add these at the top…
render() {
const { attributes, setAttributes } = this.props;
const alignmentClass = (attributes.textAlignment != null) ? ‘has-text-align-‘ + attributes.textAlignment : ”;return ([
this.getInspectorControls(),
this.getBlockControls(),
<div className={alignmentClass}>
{this.state.editMode &&
<Fragment>
<RichText
tagName=”h2″
placeholder=”Write your heading here”
value={attributes.myRichHeading}
onChange={(newtext) => setAttributes({ myRichHeading: newtext })}
/>
<RichText
tagName=”p”
placeholder=”Write your paragraph here”
value={attributes.myRichText}
onChange={(newtext) => setAttributes({ myRichText: newtext })}
/>
</Fragment>
}
{!this.state.editMode &&
<Placeholder isColumnLayout={true}>
<Disabled>
<RichText.Content
tagName=”h2″
value={attributes.myRichHeading}
/>
<RichText.Content
tagName=”p”
value={attributes.myRichText}
/>
</Disabled>
</Placeholder>
}
</div>
]);
}
…
我也在使用一个组件Fragment(wp.element包),它与React.Fragment. 如果您不熟悉它,当我们不想添加额外的不必要的 HTML 包装器时,我们会将输出包装在其中。在 React 中,一切都必须有一个根节点。当编辑模式处于活动状态时(行#13),我们会紧接着输出两个RichText组件,因此我们需要一个围绕它们的根节点。
当预览模式处于活动状态时(行#29),我们输出两个RichText组件的值。就像我们在 中所做的那样save,我们使用RichText.Content返回它们的值而不是小编辑器。
该组件Placeholder采用 flex 样式,默认情况下带有 flex-direction 行。true在 prop 中提供将其isColumnLayout更改为 flex-direction 列(因此所有内容都会堆叠)。但如前所述——您可能想跳过此组件,而是像在前端一样生成预览。
有了它,我们就有了块模式预览/编辑切换器。显然,您可以调整“编辑模式”的内容以显示控制输入等。

您可以根据需要创建任意数量的组件,而不仅限于只有一个edit功能!只需创建更多组件并将它们包含在一个return语句中。实际上,这就是 React 的理念——构建封装的代码片段,可能每个代码片段都处理自己的状态并将它们组合起来以制作复杂的 UI。


