如何创建作品集的详细教程
WordPress,作为一个内容管理器,常常被用于创建作品集网站。利用先进的用户接口设计和函数功能,新的趋势出现了:那就是使用不同的布局显示作品集项目。这篇教程详细的说明了使用Wordpress后端去创建作品显示位置,然后通过 jQuery和CSS3,利用类的方法去显示作品。
在这个教程中,我们将充分展示WordPress特色,例如自定义文章,自定义分类,同时会写一个函数来获取自定义摘要。
本文涉及的内容包括:
Step 1 – 安装WordPress和初始化 Theme.
创建我们自己的作品集的第一步安装 WordPress. 这是非常简单,如果你是第一次使用,这里有一些指导教程:wordpress安装教程
安装好后,就要创建自己的主题去显示我们的作品。创建主题有不同的方法。有的采用空白模版,有的采用TwentyTen,创建子主题 。本教程,我们采用Starker’s theme, 作者 Elliot Jay Stocks。
Step 2 – 计划布局
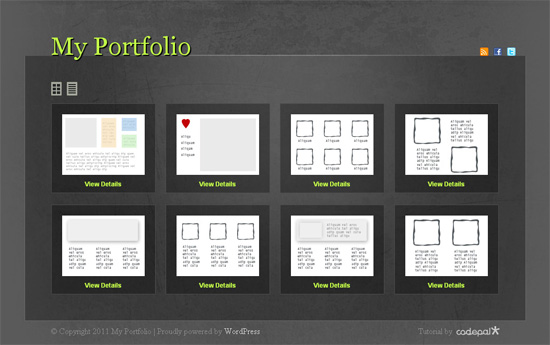
我们的作品集站点不会包含很多数据,但是一个基本的作品集站点需要包含项目图像、识别项目的标签以及一些简短的描述。多布局的主题应具有让用户选择网格和列表布局的功能。这里我们采用AJAX技术展示给浏览者,最基本的设计以网格的形式显示给用户。
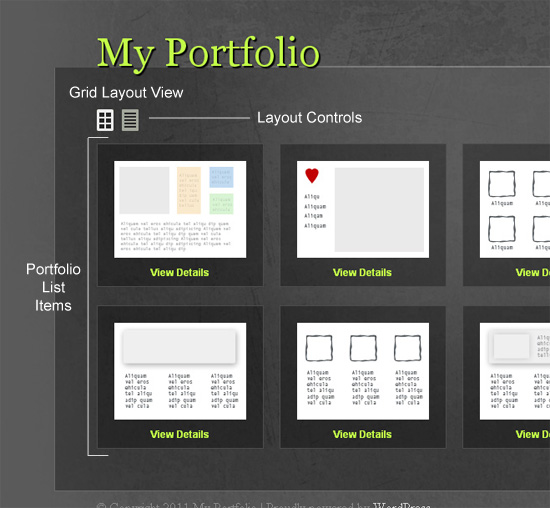
但是当用户点击列表布局,整个作品集展现形式将平滑的转换包含项目标题、匹配标签和简短描述。
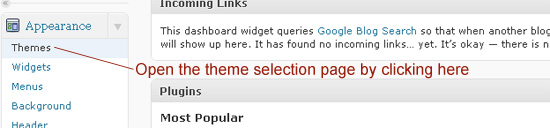
Step 3 – 设置后端
对于我们的作品集,需要注册一个自定义的文章类型,成为 “project.”
编辑 functions.php ,加入下面的语句:
/*— Creating custom post type for project –*/
add_action(‘init’, ‘project_custom_init’);
这个 project_custom_init 需要在WordPress 数据库注册自定义文章类型,加入一些标签。继续加入如下代码:
/*– Custom Post Init Begin –*/
function project_custom_init()
{
$labels = array(
‘name’ => _x(‘Projects’, ‘post type general name’),
‘singular_name’ => _x(‘Project’, ‘post type singular name’),
‘add_new’ => _x(‘Add New’, ‘project’),
‘add_new_item’ => __(‘Add New Project’),
‘edit_item’ => __(‘Edit Project’),
‘new_item’ => __(‘New Project’),
‘view_item’ => __(‘View Project’),
‘search_items’ => __(‘Search Projects’),
‘not_found’ => __(‘No projects found’),
‘not_found_in_trash’ => __(‘No projects found in Trash’),
‘parent_item_colon’ => ”,
‘menu_name’ => ‘Project’);
接下来需要设置一些自变量。
$args = array(
‘labels’ => $labels,
‘public’ => true,
‘publicly_queryable’ => true,
‘show_ui’ => true,
‘show_in_menu’ => true,
‘query_var’ => true,
‘rewrite’ => true,
‘capability_type’ => ‘post’,
‘has_archive’ => true,
‘hierarchical’ => false,
‘menu_position’ => null,
‘supports’ => array(‘title’,’editor’,’author’,’thumbnail’,’excerpt’,’comments’)
);
// The following is the main step where we register the post.
register_post_type(‘project’,$args);
}
/*– Custom Post Init Ends –*/
为 ‘Project’ 创建自定义信息
这些信息将会显示在WordPress面板上。
// Add filter to ensure the text Project, or project, is displayed when a user updates a book
add_filter(‘post_updated_messages’, ‘project_updated_messages’);
function project_updated_messages( $messages ) {
global $post, $post_ID;$messages[‘project’] = array(
0 => ”, // Unused. Messages start at index 1.
1 => sprintf( __(‘Project updated. <a href=”%s”>View project</a>’), esc_url( get_permalink($post_ID) ) ),
2 => __(‘Custom field updated.’),
3 => __(‘Custom field deleted.’),
4 => __(‘Project updated.’),
/* translators: %s: date and time of the revision */
5 => isset($_GET[‘revision’]) ? sprintf( __(‘Project restored to revision from %s’), wp_post_revision_title( (int) $_GET[‘revision’], false ) ) : false,
6 => sprintf( __(‘Project published. <a href=”%s”>View project</a>’), esc_url( get_permalink($post_ID) ) ),
7 => __(‘Project saved.’),
8 => sprintf( __(‘Project submitted. <a target=”_blank” href=”%s”>Preview project</a>’), esc_url( add_query_arg( ‘preview’, ‘true’, get_permalink($post_ID) ) ) ),
9 => sprintf( __(‘Project scheduled for: <strong>%1$s</strong>. <a target=”_blank” href=”%2$s”>Preview project</a>’),
// translators: Publish box date format, see http://php.net/date
date_i18n( __( ‘M j, Y @ G:i’ ), strtotime( $post->post_date ) ), esc_url( get_permalink($post_ID) ) ),
10 => sprintf( __(‘Project draft updated. <a target=”_blank” href=”%s”>Preview project</a>’), esc_url( add_query_arg( ‘preview’, ‘true’, get_permalink($post_ID) ) ) ),
);return $messages;
}
注册自定义分类
作品集需要分类,下面是注册自定义分类代码。
// Initialize New Taxonomy Labels
$labels = array(
‘name’ => _x( ‘Tags’, ‘taxonomy general name’ ),
‘singular_name’ => _x( ‘Tag’, ‘taxonomy singular name’ ),
‘search_items’ => __( ‘Search Types’ ),
‘all_items’ => __( ‘All Tags’ ),
‘parent_item’ => __( ‘Parent Tag’ ),
‘parent_item_colon’ => __( ‘Parent Tag:’ ),
‘edit_item’ => __( ‘Edit Tags’ ),
‘update_item’ => __( ‘Update Tag’ ),
‘add_new_item’ => __( ‘Add New Tag’ ),
‘new_item_name’ => __( ‘New Tag Name’ ),
);
// Custom taxonomy for Project Tags
register_taxonomy(‘tag’,array(‘project’), array(
‘hierarchical’ => false,
‘labels’ => $labels,
‘show_ui’ => true,
‘query_var’ => true,
‘rewrite’ => array( ‘slug’ => ‘tag’ ),
));
回到WordPress面板, 将会看到如下信息。
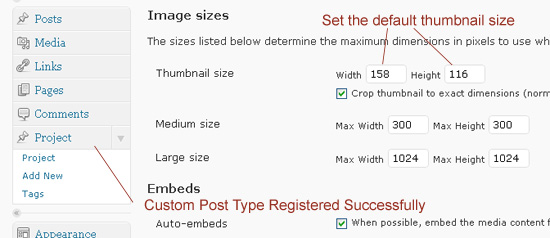
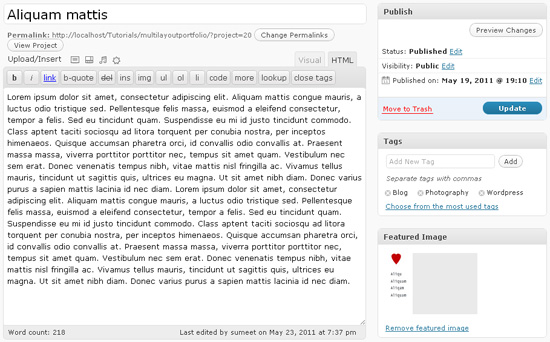
创建作品集演示项目
浏览 projects单击add new添加一个新的作品。需要项目标题、内容和缩略图,另外还有tag区、分类区也有。
Step 4 为模版写CSS代码
静态化样式
输入如下代码:
<body>
<div id=”page-wrap”>
<div id=”header”>
<!– Header Content Comes Here –>
</div>
<div id=”main-content”>
<div id=”layout-controls”>
<!– Layout Controls Area –>
<a href=”#” class=”grid”><span>Grid</span></a>
<a href=”#” class=”list”><span>List</span></a>
<div class=”clear”></div>
</div>
<ul id=”folio” class=”grid”>
<li> <!– Portfolio Item –>
<div class=”image”>
<!– Project Thumbnail Area –>
<span>
<a href=”#”><img src=”” alt=””/></a>
</span>
<a href=”#” class=”link”>View Details</a>
</div>
<div class=”content”>
<!– Project Content Area –>
<h2><a href=”#”>Project Title</a></h2>
<span class=”tags”>Tags, Tags</span>
<p> The Project Description / Excerpt</p>
</div>
<div class=”clear”></div>
</li>
</ul>
<div class=”clear”></div>
</div><!– End of Main Content –>
<div id=”footer”>
<!– Footer Content Comes Here –>
</div>
</div><!– End of Page Wrap –>
</body>
模版样式化
写下如下代码
body{
background: #5a5a5a url(‘images/bg.jpg’) no-repeat center top;
height: 100%;
}
a{
text-decoration: none;
color: #C2FC48;
}
a:hover{
color:#fff;
}
.clear{
clear: both;
}
#page-wrap{
width: 960px;
position: relative;
margin: 0 auto 40px;
}
#header{
height: 111px;
padding: 0 10px 0 50px;
}
#header h1{
float:left;
}
#header h1 a{
font-family: Georgia,Arial,Helvetica,sans-serif;
font-size: 48px;
position: relative;
text-decoration: none;
text-shadow: 2px 2px 1px #000000;
top: 64px;
width: auto;
z-index: 1000;
-moz-transition: all 0.3s ease-in-out;
-webkit-transition: all 0.3s ease-in-out;
-o-transition: all 0.3s ease-in-out;
transition: all 0.3s ease-in-out;
}
#header h1 a:hover{
color:#f4f6f0;
}
ul#social{
float: rightright;
top: 95px;
position:relative;
}
ul#social li{
float: left;
margin-right: 10px;
display: inline;
}
ul#social li a{
width: 16px;
height: 16px;
display: block;
background-image: url(‘images/layout-icons.png’);
text-indent: -99999px;
}
ul#social li a.feed{
background-position: -16px 32px;
}
ul#social li a.facebook{
background-position: 0 32px;
}
ul#social li a.twitter{
background-position: 0 16px;
}
最后基本的样式如下:
继续加入CSS代码:/*–Main Content Styles Start here –*/
#main-content{
padding: 50px 50px 28px 50px;
background-color: #000;
border-bottom: 1px #696969 solid;
border-left: 1px #696969 solid;
border-right: 1px #696969 solid;
/* Fallback for web browsers that doesn’t support RGBa */
background: rgb(0, 0, 0);
/* RGBa with 0.3 opacity */
background: rgba(0, 0, 0, 0.3);
font-family: Helvetica, Arial, sans-serif;
font-size: 12px;
color:#c7c7c7;
line-height: 16px;
}
#main-content a:hover{
color: #fff;
}
#layout-controls{
margin-bottom: 15px;
}
#layout-controls span{
width: 20px;
height: 26px;
display: block;
background-image: url(‘images/layout-icons.png’);
-moz-transition: all 0.3s ease-in-out;
-webkit-transition: all 0.3s ease-in-out;
-o-transition: all 0.3s ease-in-out;
transition: all 0.3s ease-in-out;
text-indent: -99999px;
}
#layout-controls a{
width: 20px;
height: 26px;
display: block;
float: left;
background-image: url(‘images/layout-icons.png’);
margin-right: 10px;
display: inline;
}
#layout-controls a.grid span{
background-position: left 0;
}
#layout-controls a.grid{
background-position: left -26px;
}
#layout-controls a.list span{
background-position: rightright 0;
}
#layout-controls a.list{
background-position: rightright -26px;
}
#layout-controls a:hover span{
opacity: 0; /* other browsers */
filter: progid:DXImageTransform.Microsoft.Alpha(opacity=0); /* this works in IE6, IE7, and IE8 */
}
下面的是列表样式:
/*————-General Folio Styles Starts Here—————*/
ul#folio li a{
-moz-transition: all 0.3s ease-in-out;
-webkit-transition: all 0.3s ease-in-out;
-o-transition: all 0.3s ease-in-out;
transition: all 0.3s ease-in-out;
}
ul#folio li{
/* Fallback for web browsers that doesn’t support RGBa */
background: rgb(0, 0, 0);
/* RGBa with 0.3 opacity */
background: rgba(0, 0, 0, 0.3);
padding: 20px;
border: 1px #4c4c4c solid;
margin-bottom: 22px;
-moz-transition: all 0.3s ease-in-out;
-webkit-transition: all 0.3s ease-in-out;
-o-transition: all 0.3s ease-in-out;
transition: all 0.3s ease-in-out;
}
ul#folio li:hover{
/* Fallback for web browsers that doesn’t support RGBa */
background: rgb(0, 0, 0);
/* RGBa with 0.3 opacity */
background: rgba(0, 0, 0, 0.1);
}
ul#folio li .image{
text-align: center;
}
ul#folio li .image span{
width: 158px;
height: 116px;
display: block;
overflow: hidden;
background-color: #fff;
margin-bottom: 10px;
}
ul#folio li .image span a{
width: 158px;
height: 116px;
display: block;
}
ul#folio li .image a{
font-weight: bold;
}
下面是IE的CSS补丁:
<!–[if IE]>
<style>
#main-content, ul#folio li{
background:transparent;
filter:progid:DXImageTransform.Microsoft.gradient(startColorstr=#30000000,endColorstr=#30000000);
zoom: 1;
}
ul#folio li:hover{
background:transparent;
filter:progid:DXImageTransform.Microsoft.gradient(startColorstr=#10000000,endColorstr=#10000000);
zoom: 1;
}
</style>
<![endif]–>
在 HTML结构里, 你会看到 portfolio列表类.
<ul id=”folio” class=”grid”>
以下是网格CSS样式
/*——————Grid Layout Starts Here——————-*/
ul#folio.grid li{
width: 158px;
height: 130px;
float: left;
margin-right: 19px;
display: inline;
}
ul#folio.grid li .content{
display: none;
}
ul#folio.grid li .image span a{
width: 158px;
height: 116px;
display: block;
}
ul#folio.grid li.rightmost{
margin-right: 0;
}
这是列表样式:
/*——————List Layout Starts Here——————-*/
ul#folio.list li{
display: block;
}
ul#folio.list li .image,ul#folio li.details .image{
width: 158px;
height: 130px;
float:left;
}
ul#folio.list li .content{
float: left;
padding: 0 10px 0 40px;
width: 598px;
}
ul#folio.list li .content h2,ul#folio li.details .content h2{
font-size: 24px;
color: #C2FC48;
margin-bottom: 6px;
font-family: Georgia, Arial, Helvetica, sans-serif;
}
ul#folio.list li .content span.tags,ul#folio li.details .content span.tags{
color: #fff;
font-size: 11px;
font-style: italic;
margin-bottom: 10px;
display: block;
}
使用 jQuery添加效果
接下来我们节哀那个使用 jQuery UI 修改按钮的类。
var animateSpeed = 500;
jQuery(“#layout-controls a”).click(function(){
var folio = jQuery(‘#folio’),
curClass = folio.attr(‘class’),
newClass = jQuery(this).attr(‘class’);folio.fadeOut(animateSpeed,function(){
folio
.removeClass(curClass,animateSpeed);
.addClass(newClass,animateSpeed);
}).fadeIn(animateSpeed);
return false;
});
Step 5 与WordPress主题整合
现在我们要把刚才的设计与wordpress整合到一起。
编辑header.php
添加如下代码:
<?php
/*— Registering jQuery using Google’s CDN */
if( !is_admin()){
wp_deregister_script(‘jquery’);
wp_register_script(‘jquery’, (“http://ajax.googleapis.com/ajax/libs/jquery/1.6.0/jquery.min.js”));
wp_enqueue_script(‘jquery’);
}
?>
添加JS支持:
<script src=”<?php bloginfo(‘template_url’);?>/js/jquery-ui-1.8.11.custom.js”></script>
<script src=”<?php bloginfo(‘template_url’);?>/js/script.js”></script>
创建主要的模版
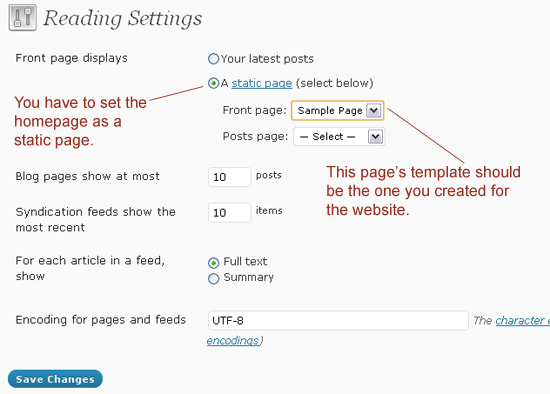
现在你需要创建另一些模版如page-home.php或修改 index.php a:
- 创建一个页面
- 设置页面为你创建的模版
到settings内.- 选择主页为静态页.
- 选择你创建的
以下是创建一个循环的方法:
<?php $loop = new WP_Query(array(‘post_type’ => ‘project’, ‘posts_per_page’ => -1));
$count =0;
?>
我们使用了一个变量count去计算项目列表数.
下面的代码是继承循环:
<?php if($loop) { ?>
<ul id=”folio” class=”grid”>
<?php while ( $loop->have_posts() ) : $loop->the_post(); ?>
下面的代码包含了缩略图的列表:
<li class=”item-<?php the_ID() ?> <?php if(++$count%4==0) echo ‘rightmost’?> “>
<div class=”image”>
<span>
<a href=”<?php the_permalink() ?>”>
<?php
if(has_post_thumbnail()){
the_post_thumbnail(‘thumbnail’);
}
?>
</a>
</span>
<a href=”<?php the_permalink() ?>” class=”link”>View Details</a>
</div>
下面的代码包含标签,摘要等。
<div class=”content”>
<h2><a href=”<?php the_permalink() ?>”><?php the_title() ?></a></h2>
<span class=”tags”>
<?php
// Fetching the tag names with respect to the post and displaying them
$args = array(‘orderby’ => ‘name’, ‘order’ => ‘ASC’, ‘fields’ => ‘names’);
echo implode(wp_get_object_terms( $post->ID, ‘tag’, $args),’, ‘);
?>
</span>
<p>
<?php
// Using custom excerpt function to fetch the excerpt
folio_excerpt(‘folio_excerpt_length’,’folio_excerpt_more’);
?>
</p>
</div>
<div class=”clear”></div>
</li>
<?php endwhile; ?>
</ul>
<?php } ?>
<?php wp_reset_query(); ?>
下面是自定义摘要的代码:
<?php
// Adding Variable Excerpt Length
function folio_excerpt_length($length) {
return 80;
}
function folio_excerpt_more($more) {
return ‘ … <span class=”excerpt_more”><a href=”‘.get_permalink().'”>Read more</a></span>’;
}
function folio_excerpt($length_callback=”, $more_callback=”) {
global $post;
if(function_exists($length_callback)){
add_filter(‘excerpt_length’, $length_callback);
}
if(function_exists($more_callback)){
add_filter(‘excerpt_more’, $more_callback);
}
$output = get_the_excerpt();
$output = apply_filters(‘wptexturize’, $output);
$output = apply_filters(‘convert_chars’, $output);
$output = ‘<p>’.$output.'</p>’;
echo $output;
}
?>
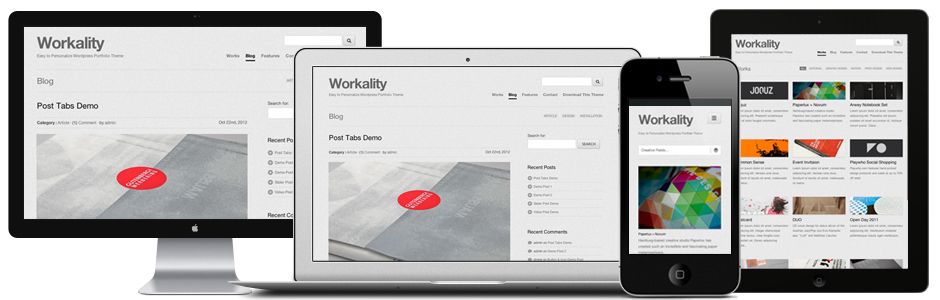
wordpress企业主题Workality:适合作品展示
Classima WordPress 主题文档
如何向 Divi 的页眉和页脚添加更多社交媒体图标